Why Stainless Steel Milling Causes Work Hardening and How to Reduce It
Stainless steel milling work hardening is one of the most common reasons why stainless steel becomes difficult to machine.
At the beginning of the cut, everything may seem stable. But after a few passes, the tool starts to wear faster,
cutting forces increase, chatter appears, and the surface finish becomes worse.
For many shops, the problem is not only the stainless steel itself.
It is often the result of rubbing, unstable cutting, dull tools, poor rigidity, or incorrect feeds and speeds.
In this guide, we explain why stainless steel milling work hardening happens,
what usually causes it, and how to reduce the problem through better tool selection and machining strategy.
Mục lục
- What is work hardening in stainless steel milling?
- Why stainless steel work hardens so easily
- Common causes of work hardening during milling
- Quick diagnosis table
- How work hardening affects tool life and surface finish
- 7 practical ways to reduce stainless steel work hardening
- What kind of end mill helps reduce work hardening?
- Common mistakes to avoid
- Final recommendation
What Is Work Hardening in Stainless Steel Milling?
Work hardening happens when the surface of stainless steel becomes harder after being deformed by cutting pressure,
heat, or rubbing.
In simple terms, if the cutting edge does not remove material cleanly, it may press, slide, or rub against the workpiece surface.
This can harden the surface layer. When the tool comes back for the next cut, it is no longer cutting the original softer surface.
It is cutting a harder, more difficult layer.
This is why stainless steel milling work hardening can become progressively worse if the cutting process is not stable.
The tool may start cutting normally, then suddenly show signs such as:
- higher cutting noise
- faster tool wear
- edge chipping
- chatter marks
- poor surface finish
- increased heat
- shorter tool life
Once work hardening begins, the process can become a cycle:
rubbing creates a harder surface, the harder surface increases tool wear,
and the worn tool creates even more rubbing.
Why Stainless Steel Work Hardens So Easily
Stainless steel is widely used because of its strength, corrosion resistance, and durability.
But these same properties also make it more sensitive in machining.
For additional background, you can review
stainless steel milling basics.
Compared with many carbon steels, stainless steel tends to generate more heat near the cutting zone.
It can also resist clean chip formation, especially if the tool edge is not sharp enough
or the cutting parameters are not suitable.
Another key issue is that stainless steel does not forgive rubbing.
If the feed is too low, the tool may not bite into the material properly.
Instead of cutting, it slides across the surface.
That sliding action can quickly trigger work hardening.
This is why choosing the right end mill and maintaining stable cutting action are very important
in stainless steel milling.
Common Causes of Work Hardening During Milling
Work hardening is usually not caused by one factor alone.
In most cases, several small issues combine and make the cutting process unstable.
1. Feed Rate Too Low
A low feed rate may seem safe, but in stainless steel it can be dangerous.
If the chip load is too light, the cutting edge may rub instead of cut.
This rubbing creates heat and surface deformation, which can lead to work hardening.
2. Dull or Worn Cutting Edge
A worn end mill cannot cut cleanly.
As the edge becomes dull, it pushes more material instead of shearing it.
That increases heat, cutting force, and the risk of hardening the surface layer.
3. Excessive Tool Overhang
Long tool overhang reduces rigidity.
When the tool is not stable, vibration becomes easier to trigger.
Vibration and inconsistent cutting load both make work hardening more likely.
4. Poor Holder Rigidity or Runout
Even a good carbide end mill can perform badly if the holder is weak or runout is too high.
Runout makes one cutting edge take more load than the others.
This can lead to uneven cutting, chipping, and rubbing.
5. Wrong Tool Geometry
A tool designed for aluminum or light general-purpose cutting may not be suitable for stainless steel.
Stainless steel usually needs a cutter with better edge strength, heat resistance, and cutting stability.
6. Poor Chip Evacuation
If chips stay in the cutting zone, they may be recut.
Recutting increases heat and can damage the cutting edge.
In stainless steel, this can quickly lead to work hardening and tool failure.
7. Unstable Cutting Strategy
Aggressive engagement, sudden load changes, or an unstable toolpath can all increase vibration and heat.
This makes the cutting process harder to control.
Quick Diagnosis Table
The table below gives a quick way to connect common milling problems with possible causes and first adjustments.
| Problem Seen in Milling | Possible Cause | What to Check First | Suggested Action |
|---|---|---|---|
| Tool wears quickly | Work hardening, heat, dull edge | Edge condition, feed rate, coating | Replace worn tool earlier and avoid rubbing |
| Chatter appears | Weak setup, long overhang, unstable load | Tool projection, holder, radial engagement | Shorten overhang and improve rigidity |
| Surface becomes rough | Rubbing, vibration, recutting chips | Feed stability, chip evacuation, runout | Improve chip flow and check holder accuracy |
| Edge chipping | Hardened surface, unstable cutting force | Entry condition, tool wear, setup rigidity | Use stainless-specific geometry and stable parameters |
| Cutting noise increases | Vibration or rising cutting load | Toolpath, overhang, machine stability | Reduce instability and adjust cutting strategy |
| Heat rises fast | Poor chip formation or recutting | Coolant, chip evacuation, feed condition | Avoid rubbing and improve chip removal |
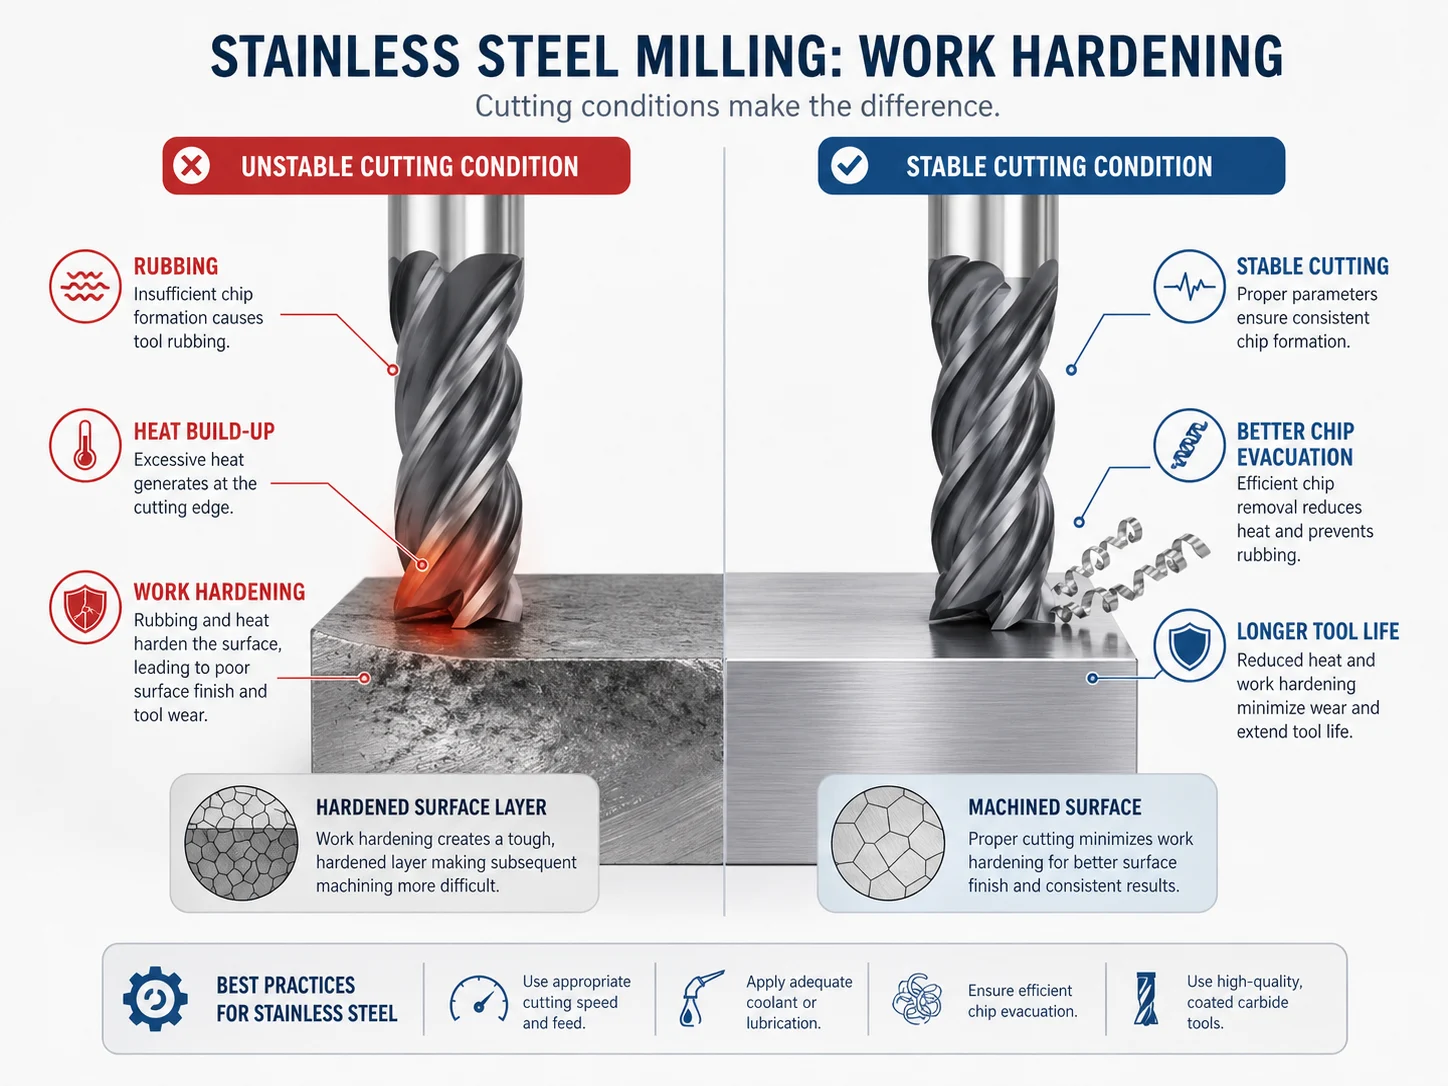
Unstable cutting conditions can cause rubbing, heat build-up, work hardening, tool wear, and chatter.
Stable cutting helps improve surface finish and extend tool life.
Not Sure What Causes Tool Wear or Chatter?
Send us your stainless steel grade, cutter size, operation type, and current machining problem.
We can help suggest a suitable end mill and a starting cutting strategy for reference.
How Work Hardening Affects Tool Life and Surface Finish
Once stainless steel work hardens, the tool has to cut a tougher surface layer.
This increases cutting force and heat.
As a result, tool life can drop quickly.
The most common effects include:
- faster flank wear
- micro-chipping on the cutting edge
- unstable cutting sound
- poor dimensional consistency
- visible chatter marks
- rougher surface finish
- shorter predictable tool life
In production, this can be especially frustrating because the problem may not appear immediately.
The first part may look acceptable, but tool life becomes inconsistent from batch to batch.
This is why controlling work hardening is not only about tool protection.
It also affects process reliability.
If chatter keeps appearing even after parameter adjustment, it is worth reviewing milling troubleshooting basics before changing the tool again.
7 Practical Ways to Reduce Stainless Steel Work Hardening
1. Keep the Tool Cutting, Not Rubbing
This is the most important rule.
In stainless steel, the cutting edge must engage the material properly.
If the feed is too low, the tool may rub the surface and trigger work hardening.
A stable chip load helps the tool cut more cleanly.
2. Use a Sharp but Stable Cutting Edge
The tool should be sharp enough to reduce cutting pressure, but not so fragile that it chips easily.
For stainless steel, the balance between sharpness and edge strength is important.
A very weak edge may fail early, while a dull edge may rub and create heat.
3. Choose an End Mill Designed for Stainless Steel
A general-purpose end mill may work in some cases, but for stainless steel, a dedicated tool is often safer.
A suitable stainless steel end mill usually has:
- stable carbide substrate
- suitable flute geometry
- heat-resistant coating
- stronger edge preparation
- better resistance to wear and chipping
You can also review our stainless steel end mill options
to match your application with a more suitable cutter design.
4. Reduce Tool Overhang
Shorter overhang improves rigidity and reduces vibration.
If the tool sticks out too far, chatter becomes more likely.
Once chatter appears, cutting load becomes unstable, and work hardening can become worse.
5. Improve Holder Rigidity and Runout Control
The tool holder is part of the cutting system.
If the holder is unstable, even the right end mill may not perform well.
Low runout helps distribute cutting load more evenly across the flutes.
This reduces edge overload and improves tool life.
6. Control Heat and Chip Evacuation
Heat is one of the biggest enemies in stainless steel milling.
Good chip evacuation helps carry heat away from the cutting zone.
If chips are trapped and recut, heat rises quickly and the cutting edge may fail earlier.
7. Use a Stable Cutting Strategy
Avoid sudden load changes whenever possible.
A stable toolpath and reasonable radial engagement can help reduce vibration and heat.
For stainless steel, consistent cutting is often better than aggressive cutting.
What Kind of End Mill Helps Reduce Work Hardening?
The best tool depends on the stainless steel grade, operation type, machine condition, and cutting strategy.
However, in many stainless steel milling applications, a suitable end mill should have these features:
| Tool Feature | Why It Matters in Stainless Steel |
|---|---|
| Solid carbide body | Improves rigidity and wear resistance. |
| Heat-resistant coating | Helps protect the edge under high temperature. |
| Stable flute geometry | Reduces vibration and improves cutting smoothness. |
| Proper edge preparation | Balances sharpness and chipping resistance. |
| Good chip evacuation | Reduces recutting and heat build-up. |
| Variable pitch or variable flute design | Helps reduce chatter in unstable conditions. |
For general side milling and profiling, a 4 flute carbide end mill for stainless steel is often a practical starting point.
For chatter-sensitive operations, variable pitch or variable flute tools may help improve stability.
But tool choice alone is not enough.
The holder, machine rigidity, cutting parameters, and toolpath must also work together.
Common Mistakes to Avoid
Using Too Low Feed to “Protect” the Tool
Many operators reduce feed too much when they hear noise or see wear.
But if feed becomes too low, rubbing increases.
This can make work hardening worse.
Running a Worn Tool Too Long
In stainless steel, worn tools can quickly damage the process.
A dull edge increases heat and cutting pressure.
Replacing the tool earlier may cost less than dealing with broken tools, rejected parts, or unstable production.
Using the Wrong End Mill Type
An aluminum end mill or weak general-purpose cutter is not ideal for stainless steel.
It may lack the edge strength and heat resistance needed for stable cutting.
Ignoring Tool Holder Quality
A high-quality end mill cannot compensate for poor clamping, high runout, or excessive overhang.
Focusing Only on Speed
Changing spindle speed may help in some cases, but work hardening often comes from rubbing,
heat, unstable engagement, or tool wear.
The full cutting system must be checked.
Final Recommendation
Stainless steel milling work hardening is not just a material problem.
It is usually the result of tool, setup, and cutting strategy working against each other.
To reduce work hardening, focus on clean cutting action.
Avoid rubbing, control heat, keep the setup rigid, and use an end mill designed for stainless steel.
A good starting point is to check these four things:
- Is the tool sharp and suitable for stainless steel?
- Is the feed high enough to cut instead of rub?
- Is the tool overhang as short as possible?
- Are chips leaving the cutting zone cleanly?
When these details are controlled, stainless steel milling becomes more stable,
tool life becomes more predictable, and problems such as chatter, chipping, and poor finish are easier to reduce.
Need Help Reducing Work Hardening in Stainless Steel Milling?
Send us your stainless steel grade, cutter size, operation type, machine details, and current machining problem.
We can help suggest a suitable end mill and a starting cutting strategy for reference.
-
Can a Custom Step Drill Hold 0.01 mm-Level Tolerances?
A real drawing-to-tool manufacturing example from HY Cutting Tools When a custom step drill is…
-
Why Do Similar Aluminum End Mills Perform So Differently?
You buy two Ø6 mm, 3-flute aluminum end mills. On paper, they look almost identical:…
-
Aluminum Sticking to End Mills: What to Check Before Changing the Tool
HY CUTTING TOOLS JOURNAL / BUYING GUIDE What to Check Before Changing the Tool Aluminum…
-
-
How to Manage Carbide Cutting Tool Costs and Supply Risk During Tungsten Price Volatility
Your next replenishment list includes carbide end mills that sell every week, along with sizes…
-
How to Choose an OEM Cutting Tool Manufacturer: 9 Essential Checks
Choosing an OEM cutting tool manufacturer is not simply a matter of finding the lowest…